Pickup Tube: Projects
The cost of just about everything is climbing ever skyward, and homebrewing is no exception. While the equipment and hardware for brewing are generally a one-time cost (until you upgrade, anyway), the fresh ingredients that are essential to our beloved hobby/obsession are an ongoing and increasing expense. Therefore, it is in your own financial best interest to collect every last bit of hot wort from your brew kettle every time you brew a batch. One great way to do this is to add a pickup tube (also called a dip tube) to the ball valve bulkhead on the inside of your kettle.
Essentially, a pickup tube allows for the draining of wort that is in the dead space below the bottom of the valve. Depending on how high your valve is mounted, this dead space can account for quite a bit of beer. The valve in my kettle is mounted very low, and the liquid that sits below the valve turned out to be 1.6 liters (or 54 ounces — about 4.5 standard American beers) in volume. I don’t know about you, but I could always use another four or five homebrews for the same money.
This project is designed for kettles with a ball valve installed. If you have a kettle without a valve, I highly suggest you read the “Projects” column in the March-April 2007 issue of Brew Your Own, as it outlines a simple and effective method for adding a valve (and optionally a thermometer as well) to either aluminum or stainless steel kettles. This is a very useful and inexpensive improvement to your equipment that will save time and effort every time you brew.
 Parts and Tools List
 Parts and Tools List
• (2) 4-inch (10 cm) sections of 1⁄2-inch hard copper pipe (approximate length)
• (1) 1⁄2-inch (1.27 cm) copper male pipe thread fitting
• (1) 1⁄2-inch (1.27 cm) copper T connector
• (2) 1⁄2-inch (1.27 cm) copper 90-degree street elbow fittings
• (2) 1⁄2-inch (1.27 cm) copper end cap fittings (optional)
• propane torch
• lead-free silver-bearing solder
• solder flux
Pickup artist
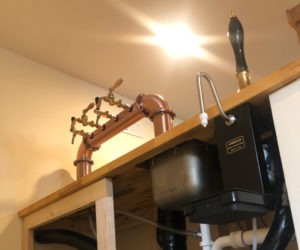
Like most things DIY, there are more than a few ways you can go about fabricating a pickup tube. For several factors — including cost, availability of parts, durability, and simplicity — I selected copper as the main material for this project. I made both a single-tube and double-tube versions, but the assembly of the latter version is outlined here.
For the sake of stability during the boil, we’re going to solder most of the pickup tube connections. That means you’ll also need a propane torch, some lead-free silver-bearing solder, and solder flux. I recently bought a kit with these things included for about $20 at a big-box hardware store.
The process of soldering copper is simple to learn (the basics), and it’s a great general home-improvement skill to have as well. There are several excellent illustrated introductory guides online that you can use for reference to help you get started, but here are the basic steps:
• Use an abrasive (such as sandpaper or a wire brush) to scuff all surfaces of the copper that will come into contact with the solder. The copper should get noticeably shinier (Figure 1)
• Apply a light coat of solder flux to the scuffed surfaces (Figure 2)
• Put the fittings together, apply direct heat with the torch for approximately 20–30 seconds, remove the flame, and then touch a short length of solder to the heated joint. If the solder doesn’t melt and suck into the joint, reapply the heat for a few more seconds and try again.
Safety first! Be sure to operate a propane torch only in a well-ventilated area. If you’re in a garage, keep the door open for the entire time you use the torch.
Check for fit
Before you get to any soldering, first screw the male pipe thread fitting into the bulkhead and assemble the pipe sections together with the T fitting and elbows (and optionally the end caps — see Figure 5). The ideal fit will have the end of the pipes a fraction of an inch short of touching the edge of the kettle. You should also angle the pipes down so that they rest on the bottom of the kettle (Figure 3). Once the fit is proper, use a Sharpie or similar to put a mark on both the T fitting and the two elbows (Figure 4). This will aid in the proper alignment of the fittings when you solder them together. I can tell you from experience that trying to eyeball the proper angle will likely yield disappointing results.
Cap it off (or not)
Just adding a pickup tube itself will greatly improve wort recovery, but while we’re at it, let’s get really greedy and go a step further. The pickup tube will stop working when the wort level drops below the top of the pipe opening. So we’re going to effectively lower the pipe opening to get more wort. This can be accomplished in one of two ways: crimp the end of the pipe with pliers, or drill out the bottom half of an end cap and solder it on. I used drilled end caps (Figure 5), but crimping works just as well.
Although you’ll get more wort from the kettle this way, the flow rate will also drop off. If you normally chill with an immersion chiller, this probably won’t affect your setup. If you use a counterflow chiller, the reduced wort flow will also likely mean you’ll need to adjust the cooling water flow rate accordingly.
All that remains is to solder the copper fittings together. Do not, however, solder the T joint to the male pipe thread fitting, as this will make your pickup tube next to impossible to attach to the valve’s threaded bulkhead fitting. If the main part of the pickup tube assemble doesn’t fit snugly in the threaded fitting, you can very lightly crimp the edges of the fitting to reduce the size of the opening (thus facilitating a tighter fit).
Whirlpool for best results
A pickup tube works best when used in conjunction with the whirlpool technique. By moving the hop particulate and hot/cold break coagulate to the center of the kettle, the pickup tube can pull clearer wort from the edge and will be far less likely to get clogged.
Enjoy the extra homebrew, and happy brewing!